Pay Kit iOS: Getting Started

Code language

To control and modify the Pay Kit iOS SDK, you can use the Swift language or the Objective-C language. The code examples and states on this page are in Swift.

See the Objective-C Examples and States section at the bottom of this page for code examples and states in Objective-C.

Prerequisites

One-time payments can be authorized for a Merchant, Brand, or Client. On-file payments can only be authorized for a Brand or Client.

Step 1 Implement the Cash App Pay Observer Protocol

To receive updates from Pay Kit, you’ll need to implement the Cash App Pay Observer protocol. Your checkout view controller can conform to this protocol, or you can create a dedicated observer class.

The CashAppPayObserver protocol contains only one method:

1func stateDidChange(to state: CashAppPayState) {
2 // handle state changes
3}

Your implementation should switch on the state parameter and respond to each of the state changes. Below is a partial implementation of the most important states.

1func stateDidChange(to state: CashAppPayState) {
2 switch state {
3 case let .readyToAuthorize(customerRequest):
4 // The customer is ready to authorize the Customer Request by deep linking in to Cash App.
5 // Enable the Cash App Pay Button.
6 case let .approved(request: customerRequest, grants: grants):
7 // The customer has deep linked back to your App from Cash App and they approved the Customer Request!
8 // The checkout is now complete.
9 case let .declined(customerRequest):
10 // The customer has deep linked back to your App from Cash App and the Customer Request is declined.
11 // This Customer Request is in a terminal state and any subsequent actions on this Customer Request will yield an error.
12 // To retry the customer will need to restart the Customer Request flow.
13 // You should make sure customers can select other payment methods at this point.
14 case .redirecting:
15 // The customer is being redirected to Cash App you can present a loading spinner if desired.
16 // NOTE: In the event that the customer does not have Cash App installed and navigates back to your app then it is
17 // up to you to set a reasonable timeout after which you dismiss the loading spinner and treat the Customer Request as failed.
18 case .integrationError:
19 // There is an issue with the way you are transitioning between states. Refer to the documentation to ensure you are
20 // moving between states in the correct order.
21 // You can perform a valid transition from this state.
22 case .apiError:
23 // Cash App Pay API is suffering degraded performance. You can can retry your event or discard this checkout.
24 // Retrying may fix the issue or reach out to Developer Support for additional help.
25 case .unexpectedError:
26 // This should never happen however in the event you receive this please reach out to Developer Support to diagnose the issue.
27 case .networkError:
28 // The Cash App Pay SDK attempts to retry network failures however in the event that a customer is unable
29 // to perform their checkout due to network connectivity issues you may want to retry the checkout.
30 ...
31 // handle the other state changes
32 ...
33 }
34}

Some of these possible states are for information only, but most drive the logic of your integration. A full list of states to handle are listed in the table below:

States

You must update your UI in response to these state changes.

StateDescription
readyToAuthorizeShow a Cash App Pay button in your UI and call authorizeCustomerRequest() when it is tapped.
approvedGrants are ready for your backend to use to create a payment.
declinedCustomer has declined the Cash App Pay authorization and must start the flow over or choose a new payment method.

Terminal states

These states cannot transition further and attempting to action on a Customer Request that is in a terminal state will result in an error.

StateDescription
approvedGrants are ready for your backend to use to create a payment.
declinedCustomer has declined the Cash App Pay authorization and must start the flow over or choose a new payment method.
Customer Requests can fail for a number of reasons, such as when customer exits the flow prematurely or are declined by Cash App for risk reasons. You must respond to these state changes and be ready to update your UI appropriately.

Error states

StateDescription
integrationErrorA fixable bug in your integration.
apiErrorA degradation of Cash App Pay server APIs. Your app should temporarily hide Cash App Pay functionality.
unexpectedErrorA bug outside the normal flow. Report this bug (and what caused it) to Cash App Developer Support.
networkErrorA networking error, likely due to poor internet connectivity.

Informational states

StateDescription
notStartedReady for a Create Customer Request to be initiated.
creatingCustomerRequestCustomerRequest is being created. For information only.
updatingCustomerRequestCustomerRequest is being updated. For information only.
redirectingSDK is redirecting to Cash App for authorization. Show loading indicator if desired.
pollingSDK is retrieving authorized CustomerRequest. Show loading indicator if desired.
refreshingCustomerRequest is being refreshed as a result of the AuthFlowTriggers expiring. Show loading indicator if desired

Step 2 Implement URL handling

To use Pay Kit iOS, Cash App must be able to call a URL that will redirect back to your app. The simplest way to accomplish this is via Custom URL Schemes, but if your app supports Universal Links you can use those URLs as well.

Choose a unique scheme for your application and register it in Xcode from the Info tab of your application’s Target. For example, the TipMyCAP application that exercises the SDK functionality configures a scheme as follows:

configure_scheme.png

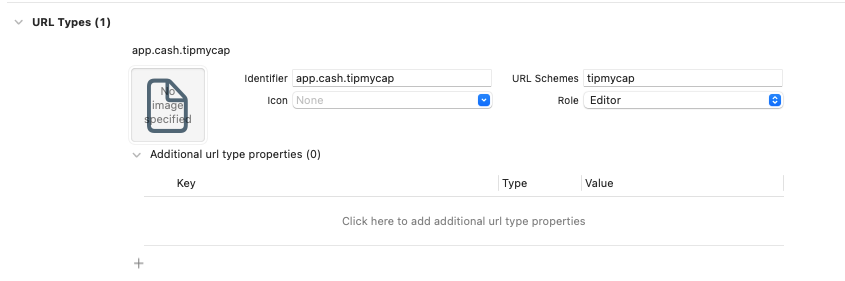
You’ll pass a URL that uses this scheme (or a Universal Link your app handles) into the createCustomerRequest() method that starts the authorization process.

When your app is called back by Cash App, post the CashAppPay.RedirectNotification from your AppDelegate or SceneDelegate, and the SDK will handle the rest:

1import UIKit
2import PayKit
3
4class SceneDelegate: UIResponder, UIWindowSceneDelegate {
5 func scene(_ scene: UIScene, openURLContexts URLContexts: Set<UIOpenURLContext>) {
6 if let url = URLContexts.first?.url {
7 NotificationCenter.default.post(
8 name: CashAppPay.RedirectNotification,
9 object: nil,
10 userInfo: [UIApplication.LaunchOptionsKey.url : url]
11 )
12 }
13 }
14}
Do Not Skip This Step!
This step is vital to ensuring the integration works correctly! You may find that in testing environments this step is not required however in production environments you will see a high number of customers not being able to complete their checkout because the SDK never enters the polling state.

Step 3 Instantiate Pay Kit iOS

When you’re ready to authorize a payment using Cash App Pay,

  1. Instantiate the SDK with your Client ID.
  2. The SDK defaults to point to the .production endpoint. For development, set the endpoint to .sandbox.
  3. Add your observer to the SDK.

For example, from your checkout view controller that implements the CashAppPayObserver protocol, you might instantiate the SDK to be:

1private let sandboxClientID = "YOUR_CLIENT_ID"
2private lazy var sdk: CashAppPay = {
3 let sdk = CashAppPay(clientID: sandboxClientID, endpoint: .sandbox)
4 sdk.addObserver(self)
5 return sdk
6}()
Make Sure You Retain The SDK!
You must strongly retain the SDK otherwise you will never recieve state changes.

Step 4 Create a Customer Request

You can create a customer request as soon as you know the amount you’d like to charge or if you’d like to create an on-file payment request. You must create this request as soon as your checkout view controller loads, so that your customer can authorize the request without delay.

Example

To charge $5.00, your createCustomerRequest call might look like this:

1private let sandboxBrandID = "YOUR_BRAND_ID"
2
3override func viewDidLoad() {
4 super.viewDidLoad()
5 // load view hierarchy
6 sdk.createCustomerRequest(
7 params: CreateCustomerRequestParams(
8 actions: [
9 .oneTimePayment(
10 scopeID: brandID,
11 money: Money(amount: 500, currency: .USD)
12 )
13 ],
14 channel: .IN_APP,
15 redirectURL: URL(string: "tipmycap://callback")!,
16 referenceID: nil,
17 metadata: nil
18 )
19 )
20}

Your Observer’s state changes to .creatingCustomerRequest, then .readyToAuthorize with the created CustomerRequest structure as an associated value.

Step 5 Authorize the Customer Request

Once the SDK is in the .readyToAuthorize state, you can store the associated CustomerRequest and display a Cash App Pay button. When the customer taps the button, you can authorize the customer request.

Example

1@objc func cashAppPayButtonTapped() {
2 sdk.authorizeCustomerRequest(request)
3}

Your app will redirect to Cash App for authorization. When authorization is completed, your redirect URL will be called and the RedirectNotification will post. Then the SDK will fetch your authorized request and return it to your Observer, as part of the change to the .approved state.

Unhappy Path

If the Customer does not have Cash App installed on their device then they will redirect to a webpage prompting them to download Cash App. In the event the customer does not download Cash App, then the SDK will remain in the polling state. The SDK does not handle this edge case and instead it is up to the implementor to set a reasonable timeout and treat the checkout as failed once that timeout is exceeded. It is suggested to dismiss any loading states and restart the Cash App Pay flow as to not block the customer from checking out.

Step 6 Pass Grants to the Backend and Create Payment

The approved CustomerRequest will have Grants associated with it that can be used with Cash App’s Create Payment API. Pass those grants to your backend and call the Create Payment API as a server-to-server call to complete your payment.

Pay Kit UI

PayKitUI provides an unmanaged CashAppPayButton and a CashAppPaymentMethod view in both UIKit and SwiftUI.

These views accept a SizingCategory to specify the preferred size of the view within your app. They also support light/dark themes by default. These views must be used as-is, without modification.

CashAppPayButton

This is an example of CashAppPayButton:

image

You can use the following example for instantiating the button:

1let button = CashAppPayButton(size: .small, onClickHandler: {})

CashAppPaymentMethod

This is an example of CashAppPaymentMethod:

image

You can use the following example for instantiating the button:

1let paymentMethod = CashAppPaymentMethod(size: .small)
2paymentMethod.cashTag = "$jack"

Analytics

If you want to monitor your integration to ensure customers are appropritately transitioning through the Cash App Pay funnel then you can track a metric in each of the CashAppPayState’s and build a funnel using the Customer Request ID.

(iOS only) Pay Kit mobile redirect limitations

iOS has a limitation that causes an interstitial page to show, requiring an extra user interaction. This happens if the time taken between the user clicking the Cash App Pay button and Pay Kit attempting to deep link exceeds 1 second.

Issue Description

Universal linking on iOS has a limitation based on an “interaction threshold”. A customer input (for example, touch, click) is required for a universal link to open an app. If the linking is done programmatically, by updating location.href for example, there is a limit of 1 second between the interaction and the actual redirection for a universal link to properly deep link into an app. If the limit is exceeded, the universal link is opened as a normal webpage instead.

When Pay Kit is managing the Cash App Pay button, the 1 second threshold will never be exceeded. However, when using the manage option to control Pay Kit manually, you must take care that the 1 second threshold is not hit.

Examples for how this may happen are: adding additional API calls after the Customer has interacted with the button but before Pay Kit is called, or running other types of form validation. Any such work should be done prior to the customer interacting with the button to avoid any extra work that might exceed the 1 second threshold which will cause the interstitial to show.

Objective-C Examples and States

General Information

SwiftObjective-C
CashAppPayObserverCAPCashAppPayObserver
CashAppPay.RedirectNotification[CAPCashAppPay RedirectNotification]
.production / .sandboxCAPEndpointProduction / CAPEndpointSandbox

Step 1

Step 1 Implement the Cash App Pay Observer Protocol

The CashAppPayObserver protocol contains only one method:

Swift code:

1func stateDidChange(to state: CashAppPayState) {
2 // handle state changes
3}

The CAPCashAppPayObserver protocol contains only one method:

Objective-C code:

1- (void)stateDidChangeTo:(CAPCashAppPayState *)state {
2 // handle state changes
3}

States

You must update your UI in response to these state changes.

SwiftObjective-C
readyToAuthorizeCAPCashAppPayStateReadyToAuthorize
approvedCAPCashAppPayStateApproved
declinedCAPCashAppPayStateDeclined

Terminal states

SwiftObjective-C
approvedCAPCashAppPayStateApproved
declinedCAPCashAppPayStateDeclined

Error States

SwiftObjective-C
integrationErrorCAPCashAppPayStateIntegrationError
apiErrorCAPCashAppPayStateApiError
unexpectedErrorCAPCashAppPayStateUnexpectedError
networkErrorCAPCashAppPayStateNetworkError

Informational states

SwiftObjective-C
notStartedCAPCashAppPayStateNotStarted
creatingCustomerRequestCAPCashAppPayStateCreatingCustomerRequest
updatingCustomerRequestCAPCashAppPayStateUpdatingCustomerRequest
redirectingCAPCashAppPayRedirecting
pollingCAPCashAppPayStatePolling
refreshingCAPCashAppPayStateRefreshing
redirectingCAPCashAppPayStateRedirecting

Step 2

Step 2 Implement URL Handling

When your app is called back by Cash App, post the CashAppPay.RedirectNotification from your AppDelegate or SceneDelegate, and the SDK will handle the rest:

Swift code:

1import UIKit
2import PayKit
3
4class SceneDelegate: UIResponder, UIWindowSceneDelegate {
5 func scene(_ scene: UIScene, openURLContexts URLContexts: Set<UIOpenURLContext>) {
6 if let url = URLContexts.first?.url {
7 NotificationCenter.default.post(
8 name: CashAppPay.RedirectNotification,
9 object: nil,
10 userInfo: [UIApplication.LaunchOptionsKey.url : url]
11 )
12 }
13 }
14}

When your app is called back by Cash App, post the [CashAppPay.RedirectNotification] from your AppDelegate or SceneDelegate, and the SDK will handle the rest:

Objective-C code:

1@import PayKit;
2
3- (void)scene:(UIScene *)scene openURLContexts:(NSSet<UIOpenURLContext *> *)URLContexts {
4 if ([URLContexts count] > 0) {
5 NSURL *url = ((UIOpenURLContext*)[[URLContexts allObjects] firstObject]).URL;
6 [[NSNotificationCenter defaultCenter]
7 postNotificationName:[CAPCashAppPay RedirectNotification]
8 object:NULL
9 userInfo:@{UIApplicationLaunchOptionsURLKey: url}
10 ];
11 }
12}
Do Not Skip This Step!
This step is vital to ensuring the inetgration works correctly! You may find that in testing environments this step is not required however in production environments you will see a high number of customers not being able to complete their checkout because the SDK never enters the polling state.

Step 3

Step 3 Instantiate Pay Kit iOS

For example, from your checkout view controller that implements the CashAppPayObserver protocol, you might instantiate the SDK to be:

Swift code:

1private let sandboxClientID = "YOUR_CLIENT_ID"
2private lazy var sdk: CashAppPay = {
3 let sdk = CashAppPay(clientID: sandboxClientID, endpoint: .sandbox)
4 sdk.addObserver(self)
5 return sdk
6}()

Make Sure You Retain The SDK!
You must strongly retain the SDK otherwise you will never recieve state changes.
For example, from your checkout view controller that implements the CashAppPayObserver protocol, you might instantiate the SDK to be:

Objective-C code:

1In the .h file:
2@property (nonatomic, strong) CAPCashAppPay *sdk;
3
4In the .m file:
5NSString *sandboxClientID = @"YOUR_CLIENT_ID";
6self.sdk = [[CAPCashAppPay alloc]initWithClientID:sandboxClientID endpoint:CAPEndpointSandbox];
7[_sdk addObserver:self];

Step 4

Step 4 Create a Customer Request

To charge $5.00, your createCustomerRequest call might look like this:

Swift code:

1private let sandboxBrandID = "YOUR_BRAND_ID"
2
3override func viewDidLoad() {
4 super.viewDidLoad()
5 // load view hierarchy
6 sdk.createCustomerRequest(
7 params: CreateCustomerRequestParams(
8 actions: [
9 .oneTimePayment(
10 scopeID: brandID,
11 money: Money(amount: 500, currency: .USD)
12 )
13 ],
14 channel: .IN_APP,
15 redirectURL: URL(string: "tipmycap://callback")!,
16 referenceID: nil,
17 metadata: nil
18 )
19 )
20}

To charge $5.00, your createCustomerRequestWithParams call might look like this:

Objective-C code:

1- (void)viewDidLoad {
2 [super viewDidLoad];
3 // load view hierarchy
4 NSString *sandboxBrandID = @"YOUR_BAND_ID";
5 CAPMoney *oneDollar = [[CAPMoney alloc] initWithAmount:500 currency:CAPCurrencyUSD];
6 [_sdk createCustomerRequestWithParams:[
7 [CAPCreateCustomerRequestParams alloc]
8 initWithActions:@[[CAPPaymentAction oneTimePaymentWithScopeID:sandboxBrandID money:oneDollar]]
9 redirectURL:[[NSURL alloc]initWithString:@"paykitdemo://callback"]
10 referenceID:NULL
11 metadata:NULL
12 ]
13 ];
14}

Step 5

Step 5 Authorize the Customer Request

When the customer taps the button, you can authorize the customer request.

Example

Swift code:

1@objc func cashAppPayButtonTapped() {
2 sdk.authorizeCustomerRequest(request)
3}

When the customer taps the button, you can authorize the customer request.

Example

Objective-C code:

1- (IBAction)cashAppPayButtonTapped:(id)sender {
2 [_sdk authorizeCustomerRequest:request]
3}

Unhappy Path

If the Customer does not have Cash App installed on their device then they will redirect to a webpage prompting them to download Cash App. In the event the customer does not download Cash App, then the SDK will remain in the polling state. The SDK does not handle this edge case and instead it is up to the implementor to set a reasonable timeout and treat the checkout as failed once that timeout is exceeded. It is suggested to dismiss any loading states and restart the Cash App Pay flow as to not block the customer from checking out.