Adobe Commerce Migration
To use the Cash App Afterpay product with Adobe Commerce (Magento 2), upgrade your extension to the latest version. Specifically:
-
Minimum v5.4.2 for Magento 2.4
-
Minimum v4.3.3 for Magento 2.3
-
Minimum v1.2.4 for Adobe PWA (Progressive Web Application) Studio
If you are on a lower version than these, please update. See the Update My Adobe Commerce Extension section below if you are not sure how to upgrade your extension to the latest version.
If you are on minimum or higher version, existing settings and configurations continue to work as before; there is no need to change them.
See the Adobe Commerce Getting Started page for detailed technical information on the Cash App Afterpay integration with Adobe Commerce.
Update My Adobe Commerce Extension
The Cash App Afterpay extension update method depends on how you, the merchant, have originally installed the Afterpay module.
If you used Composer to install the Afterpay module, then use Composer to update it. If you used a manual process to install theAfterpay module, then use a manual update to update it.
The extension update process depends on whether you want to use Composer to make the update, or do a manual update. We recommend that you update with Composer.
In either case, backup your system files before you start an update.
Update with Composer
[ADOBE-COMMERCE] folder refers to the root folder where Adobe Commerce/Magento is installed.-
Open the Command Line Interface (CLI) and go to the
[ADOBE-COMMERCE]folder on your server. -
Run one of the following commands in the table to update the Afterpay module, depending on the Magento version:
-
Make sure that Composer finishes the installation without errors.
-
Run the Adobe Commerce setup upgrade:
php bin/magento setup:upgrade. -
Run the Adobe Commerce Dependencies Injection Compile:
php bin/magento setup:di:compile. -
Run the Adobe Commerce Static Content deployment:
php bin/magento setup:static-content:deploy. -
Run the Adobe Commerce System Cache Flush:
php bin/magento cache:flush.
Cash App Pay Update with Composer
This section only applies if you have Cash App Pay installed together with Afterpay.
[CASH-APP-PAY] folder refers to the root folder where Cash App Pay is installed.-
Open the Command Line Interface (CLI) and go to the
[CASH-APP-PAY]folder on your server. -
Run one of the following commands in the table to update the Cash App Pay module, depending on the Magento version:
Then:
-
Make sure that Composer finishes the installation without errors.
-
Run the Adobe Commerce setup upgrade:
php bin/magento setup:upgrade. -
Run the Adobe Commerce Dependencies Injection Compile:
php bin/magento setup:di:compile. -
Run the Adobe Commerce Static Content deployment:
php bin/magento setup:static-content:deploy. -
Run the Adobe Commerce System Cache Flush:
php bin/magento cache:flush.
Manual Update
This method does not use Composer. It is more complex than using Composer, but just as effective when done correctly. Follow the instructions below.
Remove old Afterpay files/folders
[ADOBE-COMMERCE] folder refers to the root folder where Adobe Commerce/Magento is installed.- Remove all the files in:
[ADOBE-COMMERCE]/app/code/Afterpay/Afterpay. Then you are ready to download the Afterpay Extension.
Download the Afterpay Extension
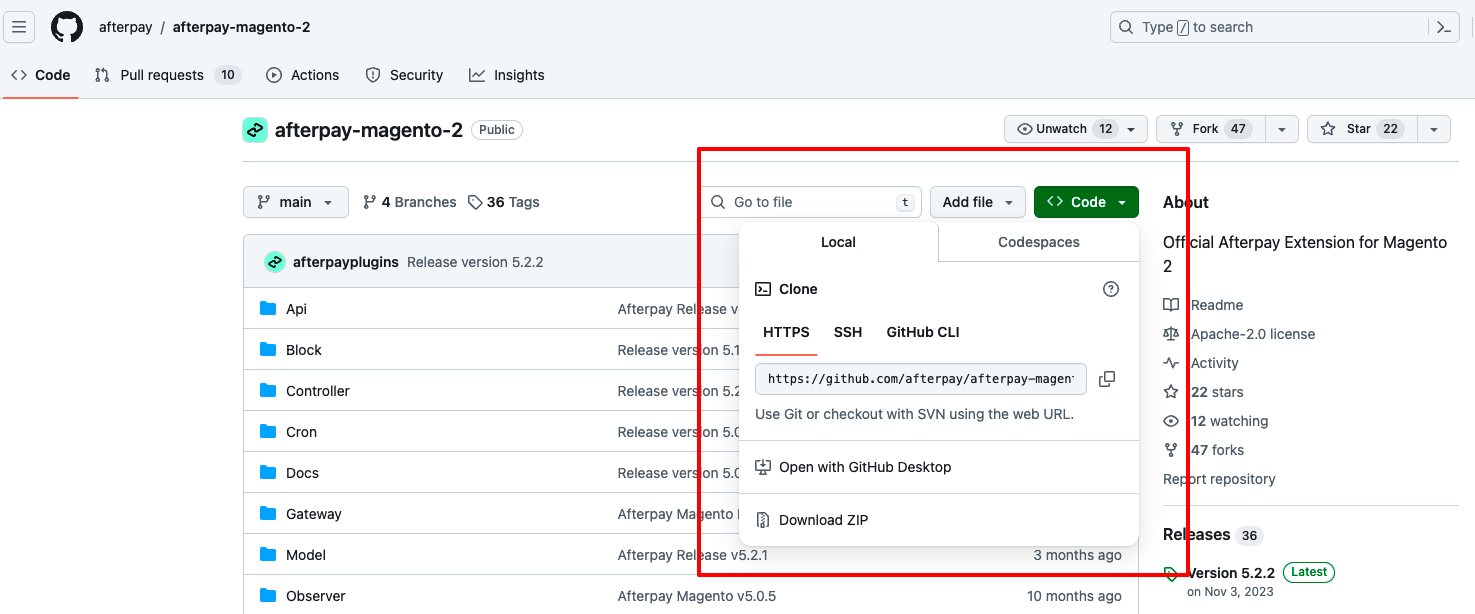
The extension is on GitHub. Do the following:
-
Go to GitHub for the link to Magento 2. The source code needed depends on your version of Magento. For these details, see the Readme file.
-
Under the green Code heading, click Download ZIP. See the screenshot below:
-
Unzip your files and put them into a temporary folder.
Install Folder
You can install Adobe Commerce in any folder on your server. In this guide, [ADOBE-COMMERCE] is the name of the root folder where Adobe Commerce is installed.
Run the Commands
-
Copy the files from your temporary folder to the
[ADOBE-COMMERCE]/app/code/Afterpay/Afterpayfolder. The temporary folder is the one you created in Step 3 in the Download the Afterpay Extension section above. -
Open the Command Line Interface (CLI) and make sure you are the owner of the
[ADOBE-COMMERCE]folder. Run all CLI commands as the owner of the folder, notrootand withoutsudo. -
From the CLI, run the commands below:
Now you need to repeat the process for the Cash App Pay Extension for Magento 2:
-
Remove the existing files in the
[ADOBE-COMMERCE]/app/code/Afterpay/CashAppfolder. -
Download and copy the files to the
[ADOBE-COMMERCE]/app/code/Afterpay/CashAppfolder. The source code path is based on the Magento version here. -
Open the Command Line Interface (CLI) and run the commands below:
You can find a table of the Afterpay Plugins for Adobe Commerce/Magento 2 here. It also contains useful information on the manual installation process.
Brand Assets
There are some new Cash App Afterpay brand assets to use at checkout and across your site. See the Brand Assets page in this guide for these new assets.
The table below has examples of the changes:


Messaging
Messaging is automatically updated if you use On-Site Messaging, our current messaging product, or its predecessor that used the JavaScript library for messaging. In both cases wait for the automatic update process to occur. Monitor your email for advance notice of this automatic update.
See the table below for an example of the changes:


The automatic Messaging update includes changes to learn more/lightbox asset if you use that.
If you use elements of Afterpay Messaging but not the standard Onsite Messaging Widget, then update the Afterpay elements with new Cash App Afterpay elements. See the Brand Assets section above.
Any custom messaging updates must be reviewed by your Account Manager.
FAQs
If you have a technical question on the migration, see our FAQs for the Migration page.