Shopify FAQ
Frequently Asked Questions:
Configuration and Setup
Can’t verify your merchant account in the Business Hub?
You need User or Hub Admin permissions in the Business Hub to verify your merchant account. Make sure you have the right permissions before trying to connect your Business Hub account.
Can’t log in to the Business Hub?
If you’ve already installed the Afterpay US payment app, you’ll be redirected to the Business Hub to verify your merchant account.
If you’re having trouble signing in:
- Use the Forgot my password link to reset your Business Hub password.
- Contact your team’s main internal onboarding contact if you need general user account access created for the Business Hub
If you are still unable access the Business Hub, contact our Merchant Admin team by using the contact information below:
Email: na-afterpay-merchant-admin@squareup.com
Phone: +1 (484) 772-2736 | We are available Monday–Friday, 7:00am–4:00pm (PST).
Please make sure to provide the following information so that we can promptly help you:
- Your full name
- Merchant ID
- Trading/Business name
- Email address
Why am I seeing “Your payment can’t be processed for technical reasons. Please try a different payment method” at checkout?
This can occur when a customer checks out with Afterpay without entering an email address.
To prevent this from happening you can go to your Shopify settings and select Customers can only check out using email.
Why are Afterpay orders not captured?
See the Shopify Manual Capture topic.
Why can’t I see Afterpay in my Express Checkout?
Afterpay is currently unavailable on Shopify Express Checkout. If you navigate to the Payment Methods you should be able to view Afterpay.
If Afterpay is not visible on the Payment Methods, please contact your Afterpay Delivery Manager.
Shopify Themes
How do I add Afterpay to my theme?
See the instructions on the Manually Add Afterpay Site Messaging to Theme page.
Why did Afterpay disappear from the Shopify product page after changing themes?
To display the Afterpay installment detail on the Shopify product pages, the active store theme is modified. When you change the Shopify theme, a new set of theme/template files is installed, which will not include the Afterpay product page display.
Although the product page display will require re-integration, Afterpay will remain active as a payment method on the Shopify checkout page.
To re-integrate the Afterpay product page display for the newly installed Shopify theme, please complete the steps outlined in the Afterpay site messaging topic.
How do I add Afterpay to my payment icons?
To place a payment icon on the footer (bottom) of the payment page, first ensure that you have enabled payment icons in your footer.
Then do the following:
-
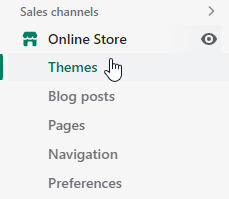
From your Shopify admin, go to Online Store and select Themes.
-
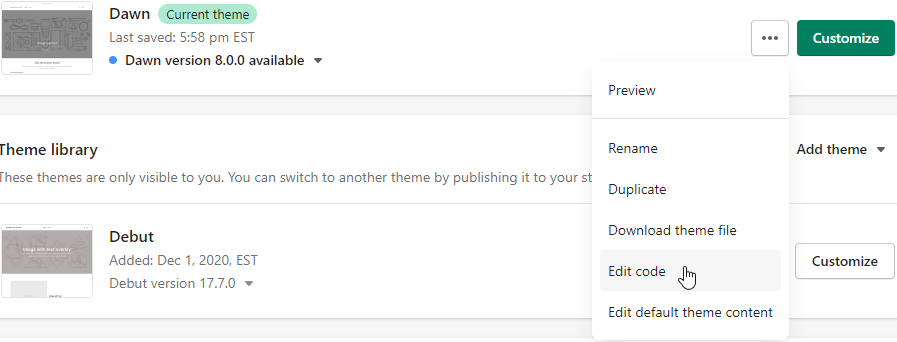
Find the theme you want to edit, then click the … button to open the Actions menu. Click Edit Code.
-
In the Sections directory, click footer.liquid.
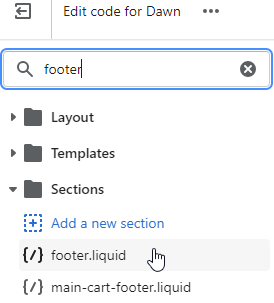
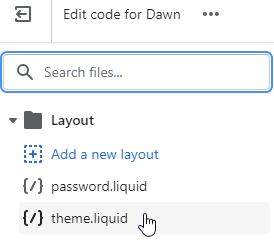
If your theme doesn’t include this file, click theme.liquid in the Layout folder.
-
Find the following code in the file:
-
Replace that line with the following two lines of code:
-
Click Save
Code language
The code examples above are in Liquid which is Shopify’s own code language.
Code language
The code examples above are in Liquid which is Shopify’s own code language.Afterpay Banner
How do I add an Afterpay banner myself?
If Afterpay messaging is already on your store and you would like to add a customizable Afterpay Banner, follow the instructions on the Add an Afterpay Banner to Shopify page.
Orders
Why was the customer returned to the Shopify checkout after trying to place an order with Afterpay?
A common cause for a customer being returned to the Shopify checkout page after trying to place an order with Afterpay is invalid order amount.
A customer’s Afterpay transaction will not be approved should the order total be:
- Below the merchant minimum order value
- Above the merchant maximum order value
- In a non-supported currency
In any of these cases the customer is returned to the Shopify checkout page.
How can I process a refund?
Afterpay orders can be refunded from Shopify and are automatically sent to Afterpay.
You can learn how to do refunds here.
How do I update my store’s minimum or maximum order value?
Please send an email with your request to merchantAdminUS@afterpay.com
Why is the amount different between a Shopify order and Afterpay after capture?
This occurs if the cart is modified after the customer is redirected to Afterpay to complete the order.
According to Shopify, payments apps must not do any of the following:
-
Use any Shopify APIs other than the Payment Apps API and mandatory webhooks for General Data Protection Regulation (GDPR)
-
For more details, see the Prohibited actions section
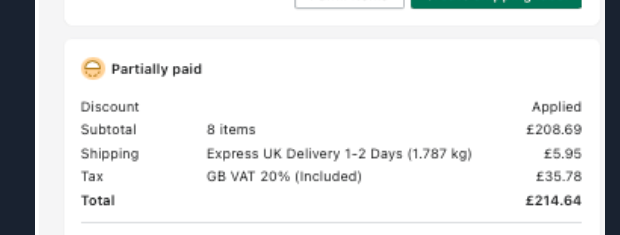
If the amount is different and the customer has paid less than the order at the Shopify shop, the order status automatically becomes Partially Paid.
Fix the problem
You, the merchant, must make a manual action to fix the problem. Here are some ideas:
-
If the amount paid is less than the final order value, you can ask the customer to submit an extra payment. Ask the customer to use a different payment method to make this payment
-
If the amount paid is more than the final order value, you can make a partial refund to resolve the discrepancy
-
You can cancel the entire order, and refund the customer. Then ask the customer to place their order again, this time with the correct number of items in the cart
If this problem occurs regularly, please inform Shopify.
Messaging
Selectively hide Afterpay Messaging
Shopify sellers manually placing the Onsite Messaging widget on their Product Detail and Cart pages can selectively hide the Onsite Messaging Widget for certain items.
Tag products you want to exclude (for example, no-cash-app-afterpay) and insert a brief code snippet into your theme files where the <square-placement> tags are located.
Cart page
Onsite Messaging App
How do I get started with Afterpay On-Site Messaging for Shopify?
To use the Afterpay On-Site Messaging app, you must install the app from the Shopify app store. Configure this app according to your preferences. This setup includes customizing the appearance of on-site messages and ensuring the messages integrate with your store’s theme.
How can I manually add Afterpay messaging to my Shopify theme?
You can manually integrate Afterpay messaging into your Shopify theme. This process involves adjusting your theme’s HTML/Liquid files to include Afterpay’s messaging scripts at the desired locations on your product and cart pages. For details see the Manually Add Afterpay Site Messaging to Theme page.
What are the implementation steps for Afterpay On-Site Messaging on Shopify?
There are several key steps to implement:
-
Ensure your store meets the technical requirements
-
Configure the app’s settings in your Shopify admin
-
Test the messaging display on your store to confirm that it functions correctly and reflects the intended customer experience.
For details on all the above steps, see the Afterpay On Site Messaging App page.
Cash App Pay
Generate Cash App Pay Logo URL on Shopify
As part of the Cash App Pay checkout setup process, you need to provide Afterpay with a logo URL. This is for a Cash App Pay logo that appears on the checkout page.
Sometimes it’s hard to figure out what this logo URL will be, so here’s a method:
-
Go to Shopify admin and log in as normal.
-
Go to the Files page.

-
Upload a square shaped logo that is at least 256 x 256 pixels in size and under 2MB file size. For the full Cash App logo specification, see the Adding Cash App Pay to Your Site page. Any square shaped logo that meets the size criteria will do, the logo does not have to be the Cash App logo.
-
Give Caash App Afterpay the URL to the logo.